
Getting started with MasterSafe Authenticator: a guided tour
Create your vault, sign in, add a two-factor account, copy a code and save a password, step by step with pictures of the app. About ten minutes.
This is a ten-minute walk through MasterSafe Authenticator as a new user would meet it: create a vault, sign in, add an account that asks for a one-time code, use the code, and store a password. Every picture is the real app, drawn here with made-up data. The pictures are in English; the app also speaks Spanish and Finnish, and you can change the language in Settings.
1. Install it
Pick the way that suits you; the app is the same.
- Windows 10 or 11: download the installer from the download section, or use Scoop:
scoop bucket add mastersafe https://github.com/GabrielVergara/MasterSafeAuthenticatorandscoop install mastersafe. - Linux: on Debian, Ubuntu and Linux Mint install the
.deb; on other systems unpack the.tar.gzand runbash install.sh.
Before you run something you downloaded, check its signature. It takes a minute and the download section explains how.
2. Create your vault
The first time you start MasterSafe there is no vault, so it asks you to create one by choosing a master password. Type it twice.
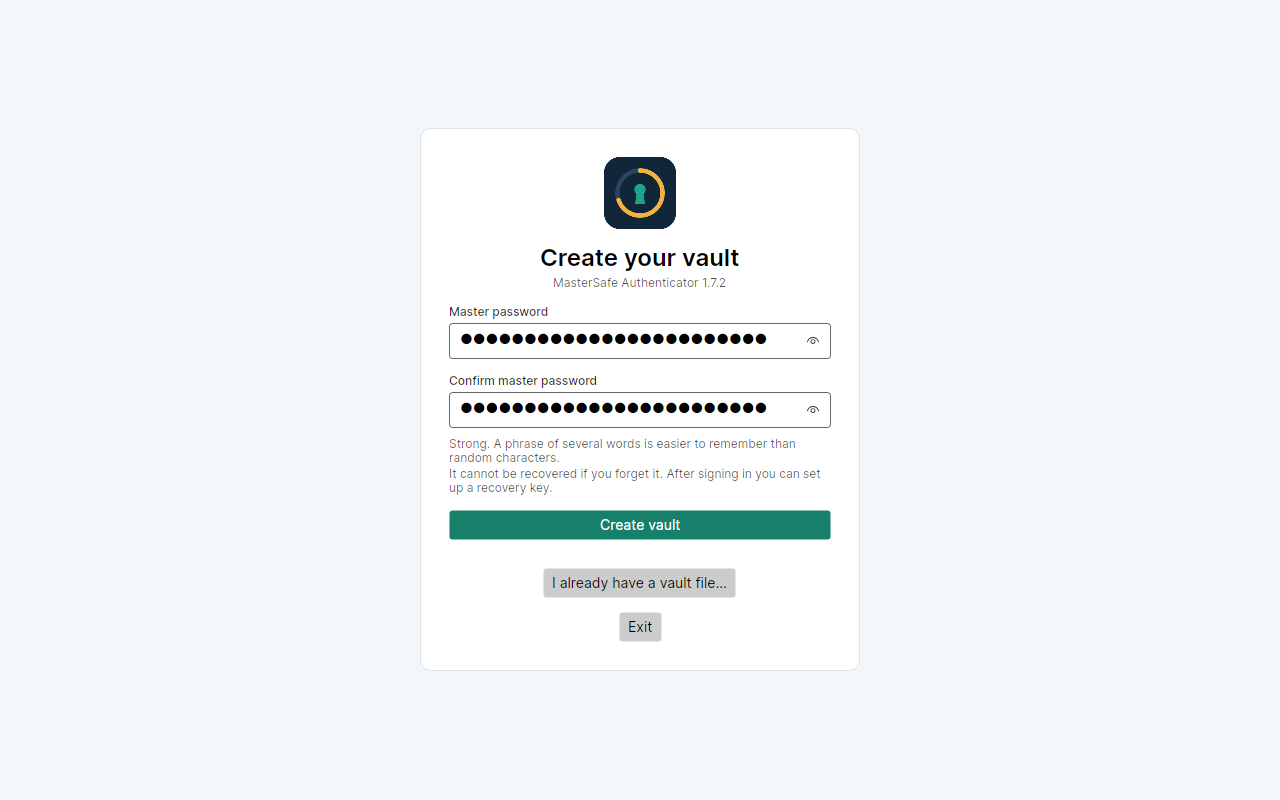
- Use a phrase of several words that you will remember. It is easier to remember than random characters and just as strong when it is long.
- It cannot be recovered. MasterSafe does not know your master password and has no server to ask. After you sign in, set up a recovery key (the Recovery page), so a forgotten password is not the end of your accounts.
- The eye icon in each box shows what you typed, in case you want to check it.
- If you already have a vault file, for example from another computer, choose I already have a vault file instead.
Choose Create vault. The first time, a short guide in the app walks through the same steps as this article.
3. Sign in
From now on, MasterSafe asks for the master password each time you open it, or after it locks itself.
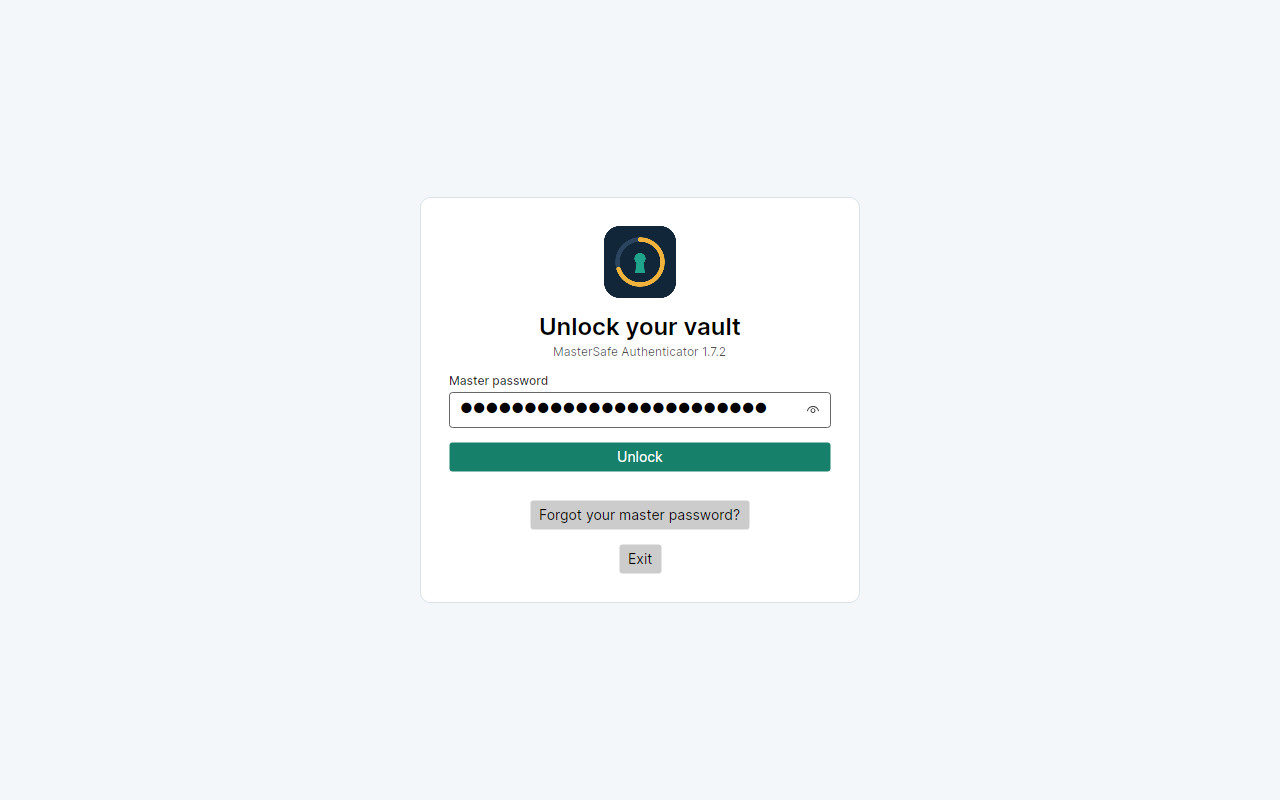
- On Windows you can also unlock with Windows Hello or a FIDO2 security key, once you turn it on in Settings. They appear as extra buttons on this screen.
- Forgot your master password? leads to the recovery with the key you saved.
4. Add your first account
An account here means a website or app where you use a six-digit code as a second step to sign in. When you turn on two-factor authentication on a site, it shows a QR code and, near it, a text key (often under "Can't scan the code?"). MasterSafe can take either.
Type the details
Open Add account and fill in the form.
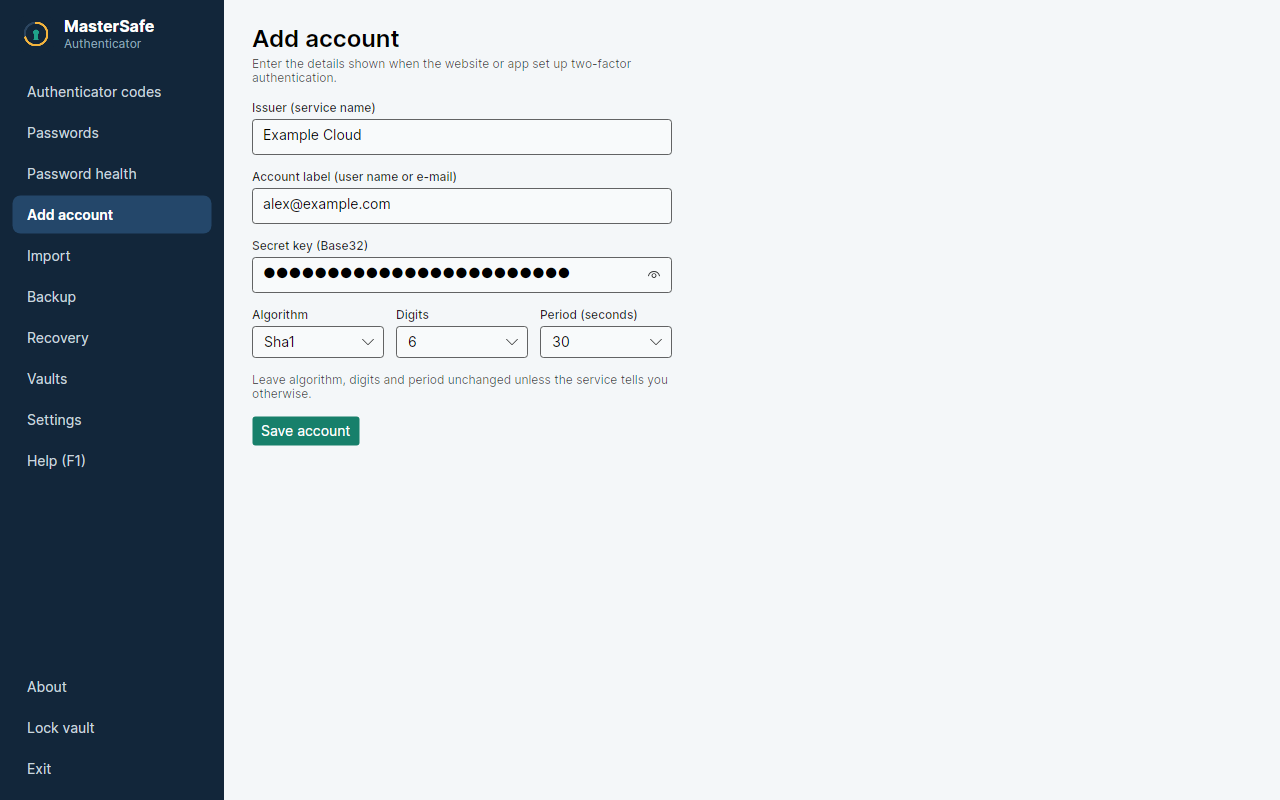
- Issuer: the service, for example GitHub.
- Account label: your user name or e-mail there, to tell several accounts apart.
- Secret key: the text key from the site, in Base32 (letters and the digits 2 to 7).
- Leave Algorithm, Digits and Period as they are unless the service tells you something else. Almost none do.
Choose Save account.
Or import it
The Import page saves typing.
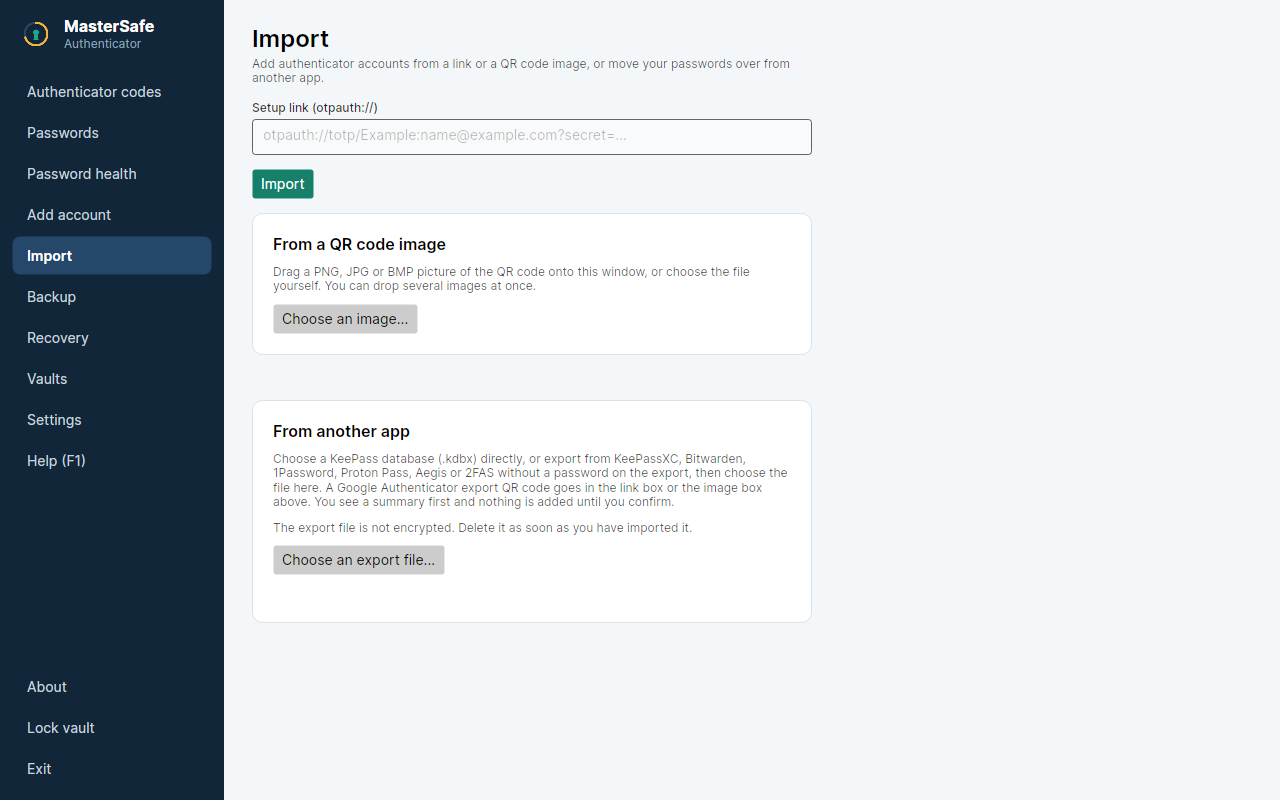
- A setup link starting with
otpauth://, if the site gives one. - A picture of the QR code. Take a screenshot of the QR code on the site, then drag the PNG, JPG or BMP onto the window. You can drop several pictures at once.
- From another app: a KeePass database, or an export from KeePassXC, Bitwarden, 1Password, Proton Pass, Aegis, 2FAS or Google Authenticator. You see a summary first and nothing is added until you confirm. The export file is not encrypted, so delete it as soon as you have imported it.
5. Use a code
Open Authenticator codes. Each account shows its current code and a ring that counts down to the next one.
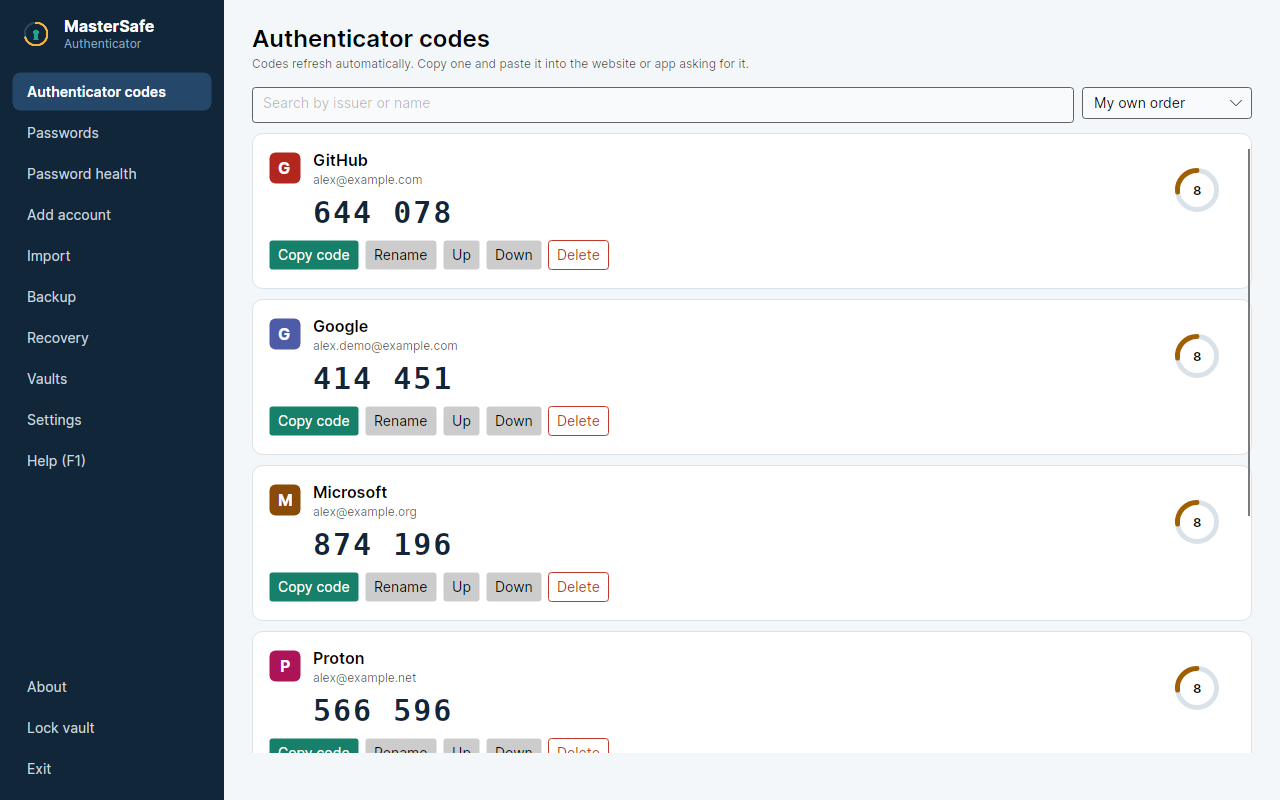
- When the site asks for the code, choose Copy code on the account.
- Paste it into the site (Ctrl+V). MasterSafe clears the clipboard after a short time, which you can change in Settings.
- If the ring is almost empty, wait for the next code: a code that is about to expire may expire before you send it.
The search box finds an account by name once you have more than a few. Up and Down put them in your own order.
6. Save a password
Open Passwords. The list is in the middle and the form for a new entry is on the right.
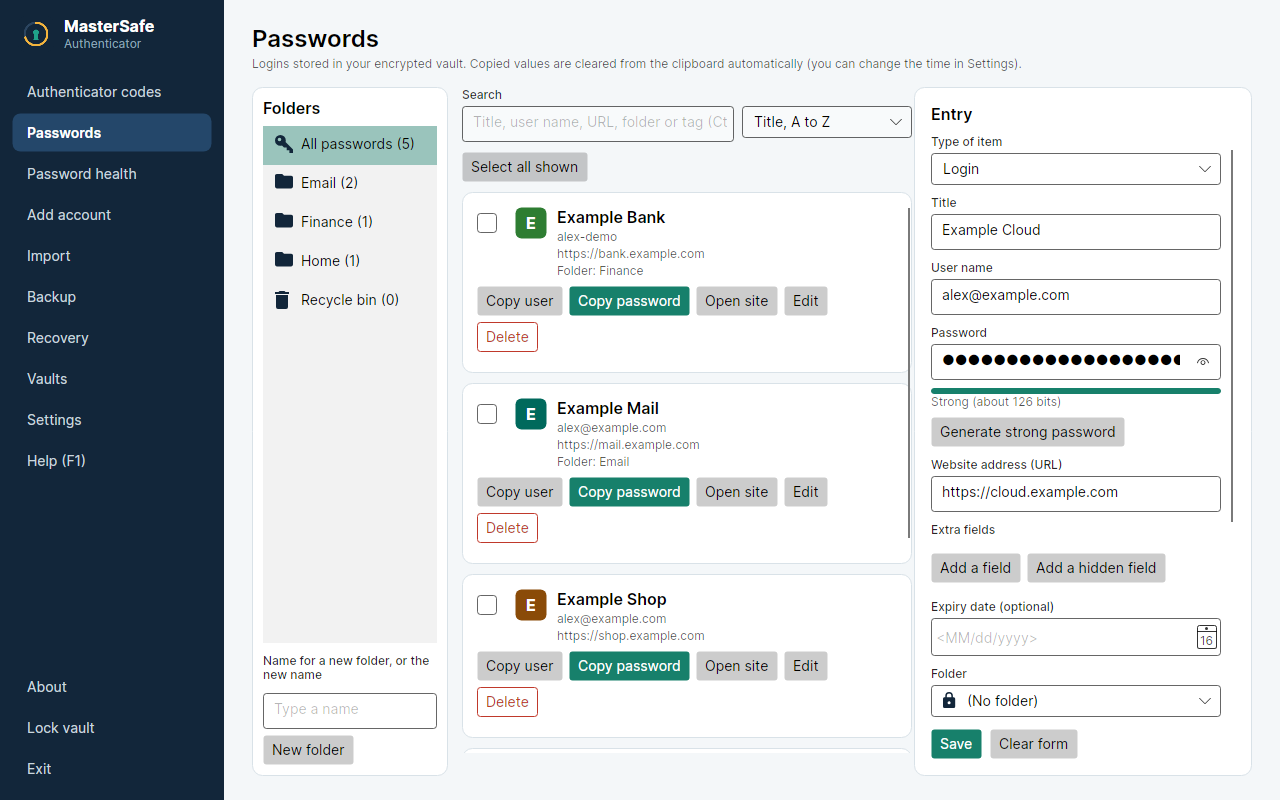
- Fill in Title (the name you will look for), User name and the website address (URL).
- For the Password, choose Generate strong password to let MasterSafe make a random one, or type your own. The bar under the box rates it ("Strong, about 104 bits"). The eye icon shows it.
- Optionally pick a Folder, add extra fields or an expiry date.
- Choose Save. The new entry appears in the list. Clear form starts over.
Then use the buttons on each entry: Copy user, Copy password, Open site, Edit and Delete. Press Ctrl+F to search; the folders on the left filter the list. A deleted entry stays in the Recycle bin for 30 days. Type of item also holds notes, cards and identities, not only logins.
Remember to change the password on the site itself too. MasterSafe stores it; it does not change it there for you.
7. Lock it
- Lock vault at the bottom of the menu, or Ctrl+L, hides everything until you sign in again. On Windows you can also turn on Ctrl+Alt+L in Settings, which works from any program.
- MasterSafe can lock itself after some minutes without use, when you minimize the window and, on Windows, when the computer locks or goes to sleep. You choose these in Settings.
- Exit closes it completely. Closing the window may only send it to the notification area, depending on Settings.
8. Keep your data safe
Your accounts live in one encrypted file on your computer. Three habits protect you from losing it:
- Save a recovery key in the Recovery page, and keep it somewhere that is not this computer.
- Make a backup in the Backup page to another disk or a USB stick, now and then.
- Know the daily snapshots. MasterSafe keeps a copy of the vault for the last 7 days, which can undo yesterday's mistake: snapshots and how to restore one.
The Password health page checks your passwords for weak, repeated or old ones, on your computer only.
Where next
- Press F1 in the app for the built-in Help.
- How to choose an authenticator app: phone, desktop or security key, and where MasterSafe fits.
- The full description: how it works, how it is built and an honest look at its limits.
- The code and the releases on GitHub (opens in a new tab), where you can also report a problem.